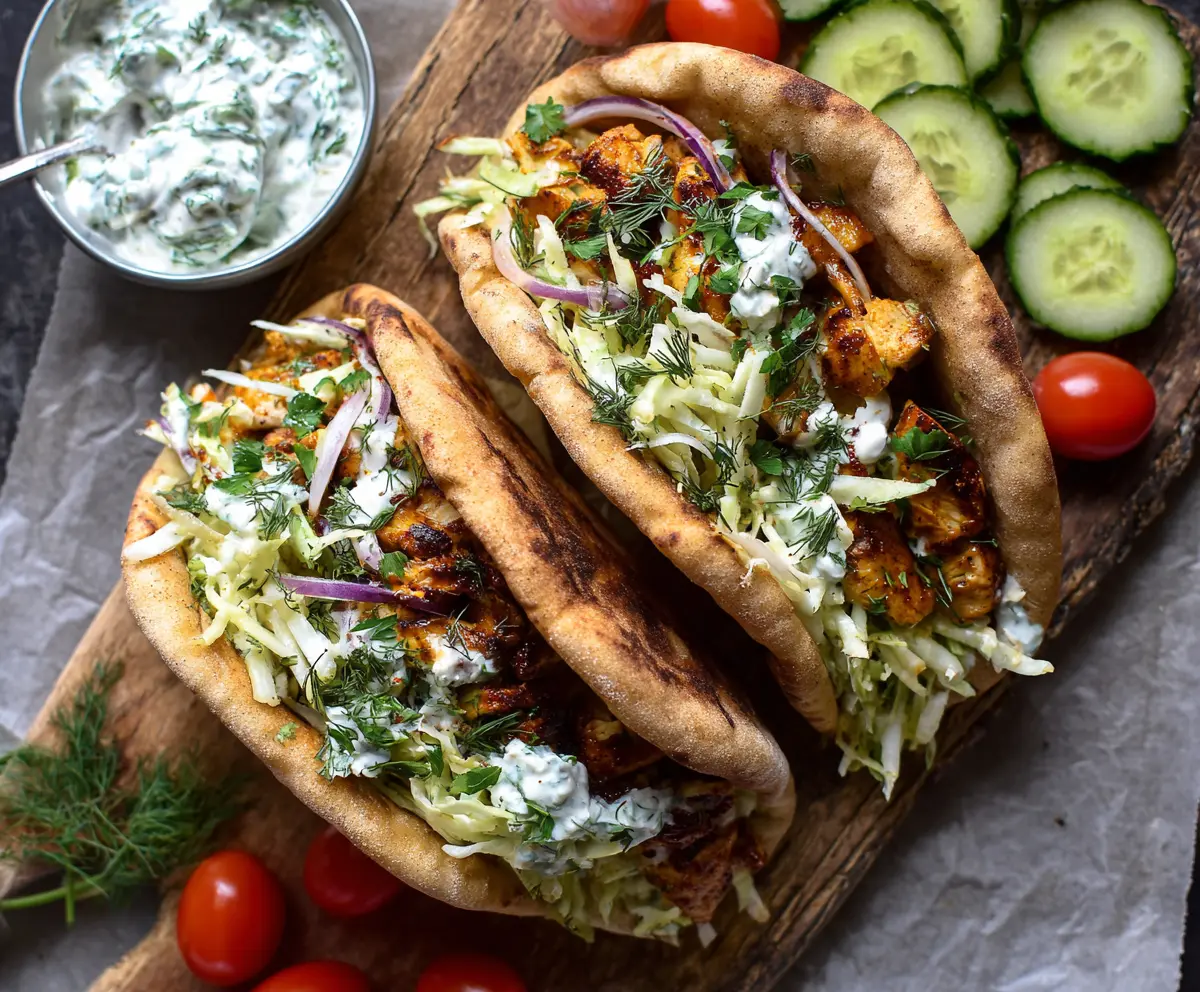
These Sheet Pan Chicken Pitas are a fun and tasty meal! Juicy chicken is cooked with colorful veggies, all wrapped up in soft pitas. Plus, a creamy herb ranch slaw on top for extra crunch!
Making these is a breeze! Just throw everything on a sheet pan and roast away. It’s a hit at my dinner table, and your family will love the mix of flavors and textures!
Key Ingredients & Substitutions
Chicken: Boneless, skinless chicken breasts or thighs are perfect for this dish. I usually prefer thighs for their juiciness. If you want a meatless option, consider using chickpeas or tofu instead.
Olive Oil: Olive oil gives a nice flavor. If you’re looking for alternatives, avocado oil works well too, or even vegetable oil if you don’t have either on hand.
Spices: Smoked paprika adds depth to the chicken. If you don’t have it, regular paprika or even chili powder could work. The cayenne is optional, but it really amps up the flavor, so consider adjusting it to your spice level!
Fresh Herbs: Fresh dill and parsley are key for the slaw and dressing. If you can’t find fresh herbs, dried herbs can be used, but reduce the amount by about a third. You can also replace with basil or cilantro if you prefer.
Pita Bread: Whole wheat pita adds nutrition. However, any flatbread would make a great substitute, like tortillas or naan.
How Do I Get My Chicken Perfectly Cooked and Charred?
Cooking chicken on a sheet pan at a high temperature not only keeps it juicy but also gives it that beautiful char. Here’s how to do it right:
- Preheat your oven well; it’s essential for a good sear. You want that heat to sear the chicken quickly!
- Spread the chicken pieces out in a single layer, giving them space to cook evenly.
- Turn the chicken halfway through to ensure even cooking and prevent sticking.
- Cook until golden brown and cooked through, about 15-20 minutes—using a meat thermometer can help ensure it’s perfect at 165°F (75°C).
My tip? Let the chicken sit for a few minutes after baking. This helps retain moisture!
How to Make Sheet Pan Chicken Pitas With Fresh Herb Ranch Slaw
Ingredients You’ll Need:
For The Chicken:
- 1.5 lbs boneless skinless chicken breasts or thighs, cut into bite-sized pieces
- 2 tbsp olive oil
- 1 tbsp smoked paprika
- 1 tsp garlic powder
- 1 tsp onion powder
- 1 tsp ground cumin
- 1/2 tsp cayenne pepper (optional for heat)
- Salt and pepper, to taste
For The Slaw:
- 2 cups green cabbage, thinly sliced
- 1 cup purple cabbage, thinly sliced
- 1 large cucumber, chopped or sliced
- 1/4 cup fresh dill, chopped
- 1/4 cup fresh parsley, chopped
- 2 tbsp fresh chives or green onions, chopped
For The Herb Ranch Dressing:
- 1/2 cup plain Greek yogurt or sour cream
- 1/4 cup mayonnaise
- 1 tbsp fresh lemon juice
- 1 clove garlic, minced
- 2 tbsp fresh dill, chopped
- 2 tbsp fresh parsley, chopped
- 1 tbsp fresh chives or green onions, chopped
- 1/2 tsp onion powder
- Salt and pepper, to taste
For Serving:
- 4 pita breads, warmed
How Much Time Will You Need?
This delicious recipe takes about 10 minutes to prepare and 20 minutes to bake the chicken. All in all, you’ll be ready to serve your flavorful chicken pitas in about 30 minutes!
Step-by-Step Instructions:
1. Preheat Oven and Prepare Chicken:
Start by preheating your oven to 425°F (220°C). In a large bowl, add the bite-sized chicken pieces. Pour in the olive oil and sprinkle over the smoked paprika, garlic powder, onion powder, ground cumin, cayenne pepper (if you like some heat), salt, and pepper. Toss everything together until the chicken is well coated with the spices.
2. Bake the Chicken:
Spread the seasoned chicken pieces out in a single layer on a baking sheet. Make sure they’re not overcrowded for even cooking. Bake them in the preheated oven for about 15 to 20 minutes, turning them once halfway through. You want the chicken to be cooked through and slightly charred on the edges. Once done, take them out of the oven and set them aside.
3. Prepare the Herb Ranch Dressing:
While the chicken is baking, grab a small bowl and whisk together the Greek yogurt, mayonnaise, fresh lemon juice, minced garlic, dill, parsley, chives, onion powder, salt, and pepper. Taste and adjust the seasoning if needed. Pop this dressing in the fridge until you’re ready to use it; it’ll stay fresh and cool!
4. Make the Slaw:
In a large mixing bowl, combine the thinly sliced green cabbage, purple cabbage, chopped cucumber, dill, parsley, and chives. Toss everything together, then add a generous amount of your herb ranch dressing, mixing again until the slaw is evenly coated.
5. Assemble the Pitas:
Warm your pita breads in the oven or on a skillet to make them soft and warm. Once warmed, carefully open each pita pocket and fill them with the warm grilled chicken pieces. Top them off with a good portion of that fresh herb ranch slaw you prepared.
6. Serve:
If you wish, drizzle a little extra herb ranch dressing on top for added flavor. Serve them immediately and enjoy your delicious meal!
This recipe is a fantastic blend of tender spiced chicken and crunchy, fresh slaw, all wrapped in warm pita bread. Perfect for a quick weeknight dinner or a delightful lunch!
Can I Use Different Proteins for This Recipe?
Absolutely! While chicken works great, you can swap it for turkey, shrimp, or even chickpeas for a vegetarian option. Just ensure that you’re adjusting cooking times accordingly, especially for quicker-cooking proteins like shrimp.
How Can I Make this Slaw Crunchier?
If you want extra crunch, try adding some grated carrots or sliced bell peppers to the slaw mix. Also, let the slaw sit for about 10 minutes after tossing with the dressing; this allows the flavors to meld while the vegetables retain their crispness.
What Can I Do with Leftover Herb Ranch Dressing?
Your leftover dressing can be stored in an airtight container in the fridge for up to a week. It’s perfect as a dip for veggies, a topping for salads, or even drizzled over grilled meats or fish!
Can I Make This Recipe Ahead of Time?
You can prep the chicken and slaw a few hours ahead of time. Just bake the chicken and assemble the pitas right before serving to keep everything fresh. Store the slaw separately until you’re ready to mix it with the dressing and serve!