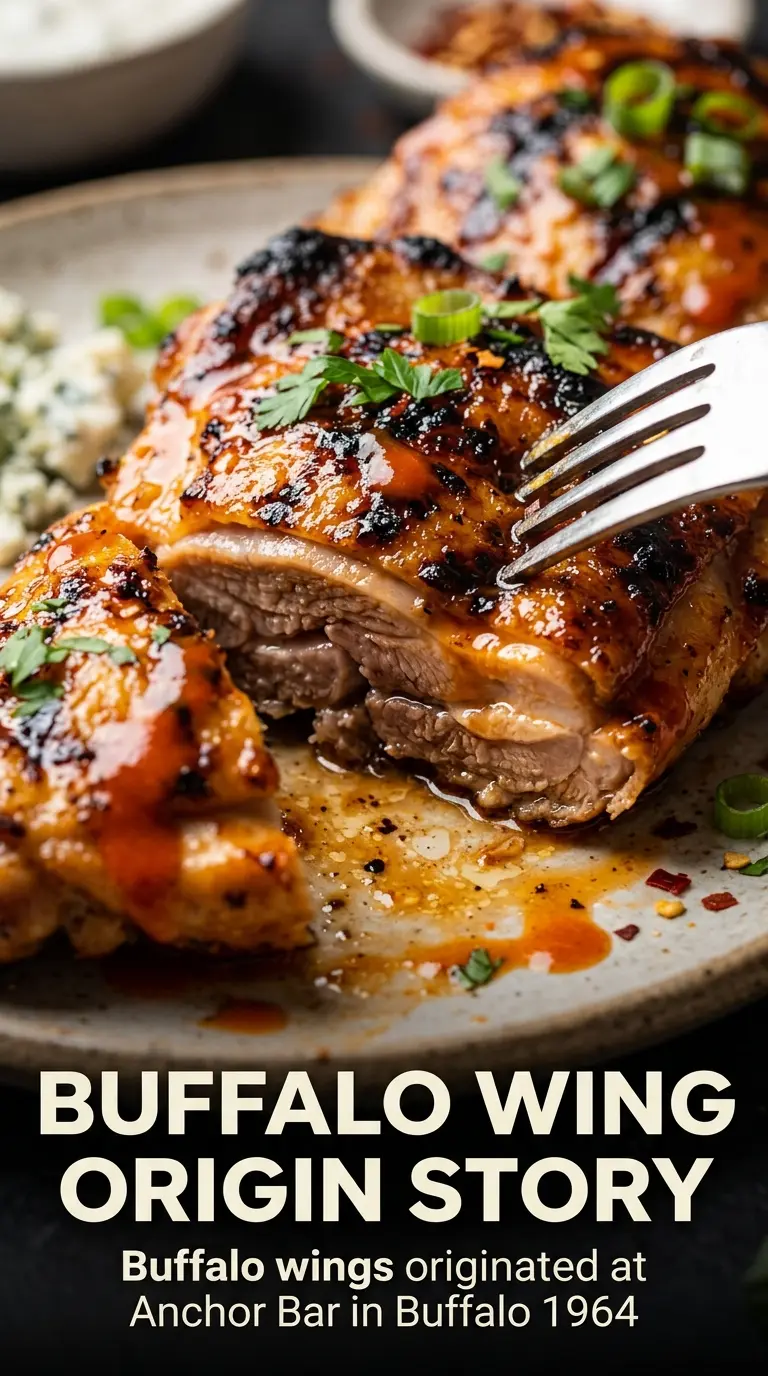
Crispy-skinned chicken thighs brushed with sticky honey-buffalo glaze are the kind of main dish that disappears fast once they hit the table. The skin gets blistered and crackly on the grill while the sauce turns glossy and clingy, with just enough sweetness to round out the heat. Served with cool blue cheese dressing and crisp celery, every bite lands with a clean contrast of spicy, sweet, salty, and rich.
The trick here is keeping the glaze balanced and not letting the sugar burn before the chicken cooks through. Honey helps the sauce lacquer the skin, but it also means you need medium heat and a little patience. Reserving part of the sauce for basting keeps the chicken from getting watered down, and that short marinating time gives the thighs enough flavor without making the skin soggy before it ever hits the grates.
Below, I’ve included the details that matter most: how to get the skin crisp, how to keep the sauce from scorching, and what to change if you want a milder, dairy-free, or oven-friendly version.
The skin got crisp before the glaze turned sticky, and the honey-buffalo sauce clung to every bite without burning. I served it with blue cheese and celery exactly like you suggested, and there wasn’t a dry piece left.
Like this honey buffalo chicken? Save it to Pinterest for crispy grilled thighs with a sticky, spicy-sweet glaze.
The Glaze Needs the Right Heat, Not More Heat
Honey-buffalo chicken thighs can go wrong in one predictable way: the outside gets dark before the inside finishes. That happens when the grill runs too hot or the sauce goes on too early and too heavy. The chicken thighs need enough time over medium heat to render the skin and cook through without turning the sugars in the glaze into bitter, scorched spots.
Reserve part of the sauce before it touches the raw chicken. That keeps the final basting sauce clean and glossy instead of thin and contaminated. Brush on a light coat before the marinate, then keep basting as the thighs cook so the flavor builds in layers instead of burning on contact.
What the Honey, Buffalo Sauce, and Butter Are Each Doing
- Chicken thighs — Bone-in, skin-on thighs stay juicy over the grill and give you enough fat under the skin to carry the glaze. Boneless thighs work in a pinch, but they cook faster and won’t give you the same crisp skin or that deep roasted flavor.
- Buffalo sauce — Use a sauce you actually like on its own, because it stays front and center here. A milder sauce gives you more control, while a very vinegary hot sauce will read sharper after the honey goes in.
- Honey — This is what makes the glaze stick and shine. Maple syrup can stand in, but it tastes rounder and less classic; the sauce will also brown a little differently, so keep an eye on it if your grill runs hot.
- Butter — Melted butter softens the heat and helps the sauce coat the chicken instead of sliding off. If you need dairy-free, use a neutral oil, but the glaze won’t taste quite as rich or finish with the same silky feel.
- Apple cider vinegar — The vinegar keeps the sauce from tasting one-note sweet and helps the glaze cut through the richness of the thighs. Lemon juice works if that’s what you have, but it brings a brighter, less mellow finish.
Building Crispy Skin Before the Sauce Takes Over
Mix the glaze and hold back the finishing portion
Stir the buffalo sauce, honey, melted butter, and vinegar until smooth, then scoop out the reserved third cup before anything else touches it. That reserved portion is your clean basting sauce, and it matters because once raw chicken has touched the brush or bowl, that mixture is no longer safe for finishing. Season the thighs with salt and pepper, then brush them lightly with the working sauce so the flavor starts before the grill.
Let the short marinate work on the surface
Thirty minutes is enough here. You want the chicken seasoned and lightly coated, not swimming in sauce long enough to soften the skin into rubber. If you push the marinating time much longer, the sugar in the glaze starts pulling moisture to the surface, and that makes crisping harder once the thighs hit the grill.
Start skin-side down and leave it alone
Lay the thighs skin-side down over medium heat and let the skin render and brown for 8 to 10 minutes. You’re looking for deep golden patches and edges that release from the grates without sticking. If the skin tears when you try to move it, it needs another minute or two; forcing it early usually means the grill is too hot or the skin hasn’t tightened enough.
Finish with frequent basting and a thermometer
Flip the thighs and cook for another 8 to 10 minutes, basting with the reserved sauce as they cook. The glaze should turn sticky and glossy, not blackened. Pull the chicken when the thickest part reaches 165°F, then rest it long enough for the juices to settle back in before serving with blue cheese dressing and celery.
How to Adjust These Grilled Chicken Thighs Without Losing the Point
Make it milder for the spice-shy crowd
Use a mild buffalo sauce and keep the honey as written. The sweetness softens the heat, but the chicken still tastes like buffalo chicken instead of plain grilled thighs. If you cut the sauce with too much extra honey, the glaze turns sticky-sweet and loses the sharp edge that makes this dish work.
Dairy-free version
Swap the butter for an equal amount of neutral oil. You’ll still get a glossy glaze, but it won’t have quite the same rounded finish or richness. Keep the blue cheese on the side for anyone who wants it, or serve with extra celery and a dairy-free ranch-style dip.
Oven method when the grill isn’t an option
Bake the thighs on a rack over a sheet pan at 425°F, skin-side up, until the skin starts to render and brown, then brush with the reserved sauce in the last 10 minutes. You won’t get the same smoke or grill marks, but the skin still crisps and the glaze still tightens up. Broil briefly at the end if you want more color, watching closely so the honey doesn’t burn.
Storage and Reheating
- Refrigerator: Store leftovers in an airtight container for up to 4 days. The skin softens a bit, but the flavor holds up well.
- Freezer: Freeze cooked thighs for up to 2 months. Wrap them tightly and freeze without the blue cheese dressing; thaw overnight in the fridge before reheating.
- Reheating: Warm in a 350°F oven, covered loosely with foil, until hot. Uncover for the last few minutes so the glaze re-tacks a little. The common mistake is blasting them in the microwave, which makes the skin rubbery and can turn the sauce greasy.