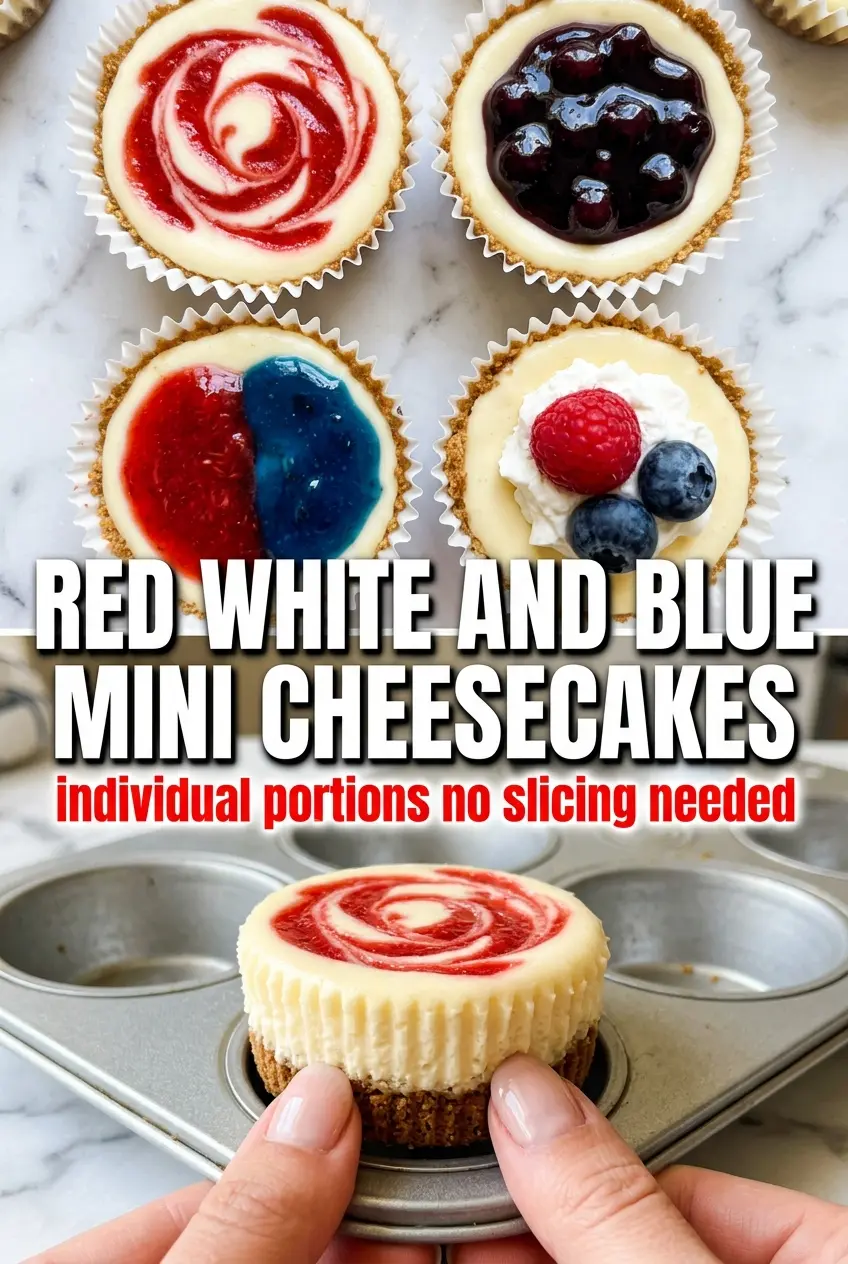
These red, white and blue mini cheesecakes bake up with a creamy center, a neat cookie crust, and just enough tang to keep each bite from feeling heavy. The size is the best part: they chill faster than a full cheesecake, portion cleanly for a crowd, and look finished the second you add the berries and whipped cream.
The filling stays smooth because the cream cheese is softened first and the eggs go in one at a time, which keeps the batter from turning lumpy or overworked. A spoonful of sour cream adds that classic cheesecake bite and helps the texture stay silky after chilling. The cookies on the bottom do double duty here too — they give you a sturdy crust without any extra mixing or pressing.
Below, I’ve included the little details that matter most, from keeping the centers from overbaking to the best way to top them right before serving. If you’ve ever had mini cheesecakes sink, crack, or come out grainy, the fixes here will save you a lot of guessing.
The centers set up perfectly after chilling, and the Golden Oreo crust stayed crisp under the cream cheese filling. I topped half with strawberries and half with blueberries, and they disappeared fast.
Save these red, white and blue mini cheesecakes for a creamy make-ahead dessert with a Golden Oreo crust and fresh berry topping.
The Center Sets in the Oven, Not on the Counter
Mini cheesecakes can go from silky to dry fast because the small size tricks people into baking them until they look firm all the way through. That’s the mistake. Pull them when the centers still have the tiniest wobble; the residual heat finishes the set while they cool, and that’s what keeps the texture creamy instead of chalky.
The other thing that matters here is the batter’s consistency before it goes into the pan. If the cream cheese isn’t fully softened, you’ll beat in pockets that never smooth out. If you overmix after the eggs go in, you add too much air, and the tops are more likely to puff and crack as they bake.
What the Cookie Base and Sour Cream Are Doing Here

The cookie under each cheesecake is more than a shortcut crust. A whole Oreo or Golden Oreo gives you a built-in base that bakes firmly, so you don’t have to press crumbs into a separate mixture or worry about a loose crust falling apart when the liners come off. Golden Oreos lean a little more vanilla-forward and let the berries stand out; classic Oreos add a deeper chocolate note if you want more contrast.
- Cream cheese — Full-fat cream cheese is the backbone here. Neufchâtel works in a pinch, but the filling will be softer and a little less rich.
- Sour cream — This adds tang and keeps the texture smooth after chilling. Plain Greek yogurt can stand in, but it brings a slightly sharper flavor and a less luscious finish.
- Eggs — These set the filling. Add them one at a time so the batter stays smooth and emulsified instead of turning loose or curdled-looking.
- Golden Oreos or Oreos — Use whichever flavor you want in the final bite. Golden Oreos pair best with the strawberries and blueberries because they keep the flavor clean and bright.
- Fresh berries — Use fresh, not frozen, for the top. Frozen berries leak juice as they thaw and make the whipped cream slide around.
How to Keep the Fillings Smooth and the Toppings Bright
Start With a Soft, Lump-Free Base
Beat the cream cheese and sugar until the mixture looks glossy and completely smooth before anything else goes in. You should not see streaks or little curds around the bowl. If the cream cheese is still cool in the center, stop and let it sit longer; cold cream cheese is the main reason mini cheesecakes end up grainy.
Add the Eggs Without Whipping Air Into the Batter
Mix in the eggs one at a time, just until each one disappears. The batter should look thick, smooth, and a little satiny, not fluffy. Too much mixing here traps air that expands in the oven and can leave you with puffy tops and cracks once the cheesecakes cool.
Bake Until the Middle Still Quivers
Spoon the batter over the cookies and fill each cup about three-quarters full. Bake until the edges are set and the centers still wobble slightly when you nudge the pan, usually right around the 18-minute mark. If the tops look completely firm in the oven, they’re already overdone.
Chill Before You Decorate
Let the cheesecakes cool in the pan first, then move them to the refrigerator for at least two hours. They need that time to firm up enough to hold the toppings cleanly. Add the whipped cream, strawberries, blueberries, and sprinkles right before serving so the fruit stays fresh and the whipped cream keeps its shape.
Three Ways to Make These Mini Cheesecakes Fit the Table
Use classic Oreos for a deeper chocolate base
Swap the Golden Oreos for regular Oreos if you want a darker crust that reads more like cookies and cream. The filling stays the same, but the chocolate base gives the berries a little more contrast and makes the dessert feel richer.
Make it gluten-free with certified gluten-free sandwich cookies
Use a gluten-free cookie that bakes into a firm bottom, then proceed exactly the same way. The texture will stay close to the original as long as the substitute cookie is sturdy enough to hold its shape under the batter.
Swap the fruit to match what you have
Raspberries or chopped cherries work if strawberries aren’t available, and blackberries give the top a deeper color. Keep the topping fresh and dry, since juicy fruit is what makes the whipped cream slide and softens the cheesecake surface fastest.
Storage and Reheating
- Refrigerator: Store the baked cheesecakes, uncovered or lightly covered, for up to 4 days. Add the berries and whipped cream just before serving so the tops stay neat.
- Freezer: Freeze the un-topped cheesecakes tightly wrapped for up to 2 months. Thaw them in the refrigerator overnight, then add toppings after they’re fully cold.
- Reheating: These aren’t meant to be reheated. Serve them chilled, because warming them softens the filling and dulls the clean cheesecake texture.
Answers to the Questions Worth Asking
Red, White and Blue Mini Cheesecakes
Ingredients
Equipment
Method
- Preheat the oven to 325°F and line a 12-cup muffin tin with cupcake liners.
- Place one Oreo or Golden Oreo cookie flat in the bottom of each liner.
- Beat the cream cheese and granulated sugar until smooth.
- Add the eggs one at a time, mixing well after each addition.
- Beat in the vanilla extract and sour cream until the batter is smooth.
- Divide the batter evenly among the 12 cups, filling each about 3/4 full.
- Bake at 325°F for 18–20 minutes, until the centers are just barely set (they will firm up as they cool).
- Cool the cheesecakes in the pan for 30 minutes.
- Refrigerate for at least 2 hours to fully chill and set.
- Just before serving, top each mini cheesecake with a swirl of whipped cream.
- Add a strawberry slice and a few blueberries to each cheesecake, then finish with a pinch of red and blue sprinkles.